62899191957
//kanvah.com/cdn/shop/files/the-japanese-bridge-2-1924.jpg?v=1724865026
//kanvah.com/cdn/shop/files/the-japanese-bridge-2-1924_20___20Large-framed-mockup-BLACK-08-24.jpg?v=1735968149
1.0
//kanvah.com/cdn/shop/files/the-japanese-bridge-2-1924_20___20Large-framed-mockup-BLACK-08-24.jpg?v=1735968149 1.0
//kanvah.com/cdn/shop/products/Mockup-Square_E2_80_9411-the-japanese-bridge-2-1924.jpg?v=1735968149 1.0
//kanvah.com/cdn/shop/products/Mockup-Square_E2_80_9412-the-japanese-bridge-2-1924.jpg?v=1735968149 1.0
//kanvah.com/cdn/shop/products/Mockup-Square_E2_80_9413-the-japanese-bridge-2-1924.jpg?v=1735968149 1.0
//kanvah.com/cdn/shop/products/Mockup-Square_E2_80_9414-the-japanese-bridge-2-1924.jpg?v=1735968149 1.0
//kanvah.com/cdn/shop/products/Mockup-Square_E2_80_9415-the-japanese-bridge-2-1924.jpg?v=1735968149 1.0
//kanvah.com/cdn/shop/products/Mockup-Square_E2_80_9416-the-japanese-bridge-2-1924.jpg?v=1735968149 1.0
//kanvah.com/cdn/shop/products/Mockup-Square_E2_80_9417-the-japanese-bridge-2-1924.jpg?v=1735968149 1.0
//kanvah.com/cdn/shop/products/Mockup-Square_E2_80_9418-the-japanese-bridge-2-1924.jpg?v=1735968149 1.0
//kanvah.com/cdn/shop/products/Mockup-Square_E2_80_9419-the-japanese-bridge-2-1924.jpg?v=1735968149 1.0
//kanvah.com/cdn/shop/products/Mockup-Square_E2_80_9420-the-japanese-bridge-2-1924.jpg?v=1735968149 1.0
//kanvah.com/cdn/shop/files/the-japanese-bridge-2-1924_20___20Large-canvas-mockupHanging-Square-Canvas-Mockup-WL_SMALL_5c3452b5-add9-4e27-bc68-8ea5b94f85dd.jpg?v=1735968149 1.000914913083257
//kanvah.com/cdn/shop/files/the-japanese-bridge-2-1924_20___20Large-framed-mockup-WHITE-08-24.jpg?v=1735968149 1.0
//kanvah.com/cdn/shop/files/the-japanese-bridge-2-1924_20___20Large-framed-mockup-GOLD-08-24.jpg?v=1735968149 1.0
//kanvah.com/cdn/shop/files/the-japanese-bridge-2-1924_20___20Large-framed-mockup-SILVER-08-24.jpg?v=1735968149 1.0
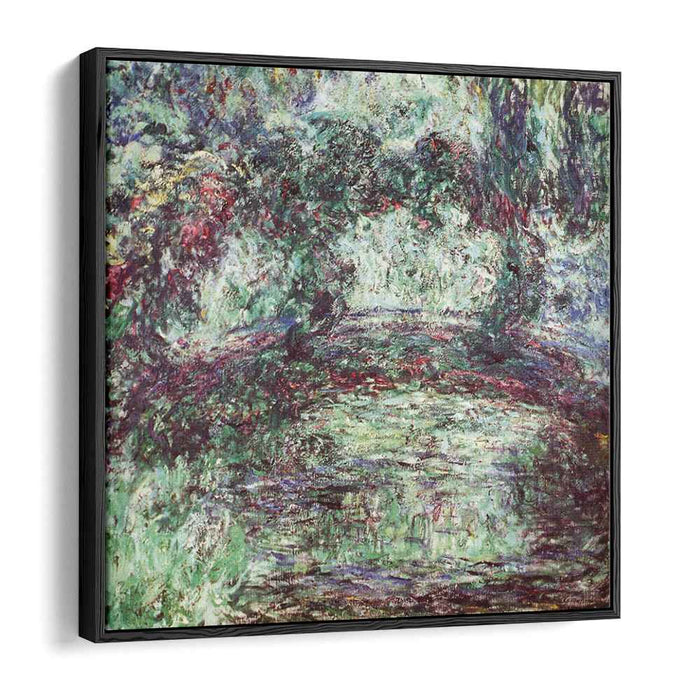
Claude Monet's "The Japanese Bridge 2": A Serene Sanctuary of Light, Color, and Reflection
Immerse yourself in the enchanting world of Claude Monet's "The Japanese Bridge 2" (1924), meticulously recreated on high-quality canvas. This iconic masterpiece transports you to the heart of Monet's Giverny garden, where serene beauty unfolds before your eyes.
Monet's Techniques: Capturing the Essence of Light and Water
In "The Japanese Bridge 2," Monet's signature brushstrokes dance across the canvas, capturing the shimmering reflections of water and the interplay of light and shadow. His vibrant palette, dominated by greens, blues, and pinks, creates a sense of harmony and tranquility.
Beyond the Image: Symbolism and Meaning
The Japanese Bridge becomes more than just a structure – it's a symbol of connection, both between the natural and human worlds, and between the past and present. The bridge leads to a hidden path, inviting viewers to explore the depths of the garden and their own inner landscapes.
Artistic Context: From Impressionism to Late Monet
"The Japanese Bridge 2" belongs to Monet's late period, when he delved into a more contemplative and serene style. This work exemplifies his mastery of capturing the fleeting effects of light and atmosphere, solidifying his legacy as one of the greatest Impressionist painters.
Feelings Conveyed: Tranquility, Harmony, and the Beauty of Nature
Monet's "The Japanese Bridge 2" evokes a sense of tranquility and serenity. It's a reminder of the beauty that surrounds us, even in the midst of life's complexities. The painting invites viewers to pause, reflect, and appreciate the simple joys of nature.
Experience the Masterpiece in Your Own Space
This museum-quality canvas print captures every subtle nuance of Monet's original. "The Japanese Bridge 2" becomes a serene sanctuary in your home, a place to escape, recharge, and reconnect with the beauty of nature.
Let Claude Monet's "The Japanese Bridge 2" transport you to a world of tranquility, inspire contemplation, and remind you of the enduring power of art to uplift and inspire.
45645192855701
45645192855701::12" x 12" / Fine Art Poster::::,
45645192888469::16" x 16" / Fine Art Poster::::,
45645192921237::24" x 24" / Fine Art Poster::::,
45645192954005::30" x 30" / Fine Art Poster::::,
45645192986773::40" x 40" / Fine Art Poster::::,
43467750080661::12" x 12" / Canvas::::,
43467750113429::16" x 16" / Canvas::::,
43467750146197::24" x 24" / Canvas::::,
43467750178965::30" x 30" / Canvas::::,
43467750211733::40" x 40" / Canvas::::,
43467750244501::12" x 12" / White Frame::::,
43467750310037::16" x 16" / White Frame::::,
43467750342805::24" x 24" / White Frame::::,
43467750375573::30" x 30" / White Frame::::,
43467750408341::40" x 40" / White Frame::::,
43467750441109::12" x 12" / Black Frame::::,
43467750473877::16" x 16" / Black Frame::::,
43467750506645::24" x 24" / Black Frame::::,
43467750539413::30" x 30" / Black Frame::::,
43467750572181::40" x 40" / Black Frame::::,
45043229622421::12" x 12" / Gold Frame::::,
45043229687957::16" x 16" / Gold Frame::::,
45043229753493::24" x 24" / Gold Frame::::,
45043229819029::30" x 30" / Gold Frame::::,
45043229884565::40" x 40" / Gold Frame::::,
45043229655189::12" x 12" / Silver Frame::::,
45043229720725::16" x 16" / Silver Frame::::,
45043229786261::24" x 24" / Silver Frame::::,
45043229851797::30" x 30" / Silver Frame::::,
45043229917333::40" x 40" / Silver Frame::::,
ar-view-on-your-wall